Happy Birthday AiC, and an Easy Peanut Butter Chip Pie

A year ago today, I published my first post on Antics in Cooking, Spicy Sausage Pasta. Little did I think then I would still be doing this a year later. I started it as a way to chronicle many of the new dishes I was trying as I was really diving into cooking every meal, attempting to alleviate some of that stress from my wife. I was finding many of the recipes I was trying through similar blogs, which have been an immense help for me. 

I stand by the original description, still on the home page today, “…sharing terrible photos and awesome recipes, and having fun doing it.” I really have enjoyed it, and I still take really horrible pictures!

For the first birthday of the site, I thought I would share what I eat for my “birthday cake” for as long as I care to remember. I actually can’t remember when I had an actual real cake for my birthday. They do nothing for me. I started out many years ago making a Jack Daniels Pie (mix between a pecan pie and a chocolate chip pie) for my birthday. It was/is an amazing pie. Then one year, my wife made me this Peanut Butter Chip Pie. I have never looked back.

IMG_2120

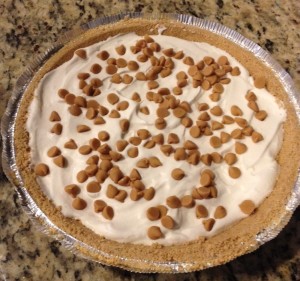
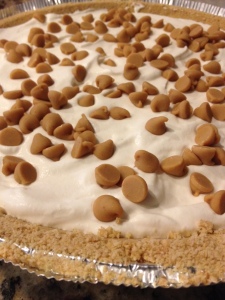
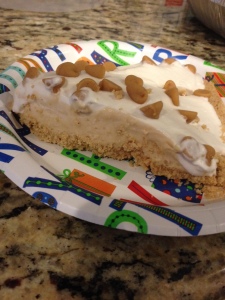
I have a thing for peanut butter chips. Like, I will just eat them out of the bag for a snack. I much prefer them to chocolate chips. Anyway, the pictures here are what the pie looks like when my wife is done making it. When a slice gets to my plate, I will have grabbed the leftover chips and completely covered the top of my piece to where you can barely see the whipped topping through the chips. I highly recommend this technique!!

IMG_2122 IMG_2124

Enjoy!

Easy Peanut Butter Chip Pie

Ingredients

3 oz cream cheese, softened

1 teaspoon lemon juice

1 2/3 cups (10-oz. pkg.) Reese’s Peanut Butter Chips, divided

2/3 cup sweetened condensed milk (not evaporated milk)

1 cup cold whipping cream, divided

1 packaged chocolate or graham cracker crumb crust (I recommend graham)

1 tablespoon powdered sugar

1 teaspoon vanilla extract

Directions

Beat the cream cheese and lemon juice in medium bowl on medium speed of mixer until fluffy, about 2 minutes. Set aside.

Place 1 cup peanut butter chips and sweetened condensed milk in medium microwave-safe bowl. Microwave for 45 seconds; stir. If necessary, microwave an additional 15 seconds at a time, stirring after each heating, until chips are melted and mixture is smooth when stirred.

Add warm peanut butter mixture to cream cheese mixture, Beat on medium speed until blended, about 1 minute. Beat ½ cup whipping cream in small bowl until stiff; fold into peanut butter mixture. Pour into crust. Cover, refrigerate about 6 hours or until firm.

Just before serving, combine remaining ½ cup whipping cream, powdered sugar and vanilla in small bowl. Beat until stiff; spread over filling. Garnish with remaining peanut butter chips. Cover and refrigerate leftover pie.

Recipe courtesy of the Hershey’s Holiday Collection cook book, 2002.

Come find me on Facebook here and Pinterest here.

Mom’s White Chocolate Pretzel Mix

It seems most people have a preference on eating a sweet, or salty snack. But most people I have found, no matter which way they lean, love them both together. This is one of those sweet and salty snacks (maybe treat is a better word) that both children and adults will love. And there are two healthy cereal’s in here so it can’t be too bad for you right?? This version came from my Mom, who would always have a big bag of this waiting for us when we would visit. And unless you are making this for an Army, I would recommend cutting the recipe in half.

The below pictures are from when it was cooling. I forget to take any after it was broken apart.

IMG_1845

IMG_1848 IMG_1847

White Chocolate Pretzel Mix

Ingredients

1 package (10 oz) mini pretzels

5 cups Cheerios cereal

5 cups Corn Chex cereal

2 cups salted peanuts

1 pound M&M’s

2 packages (12 oz each) vanilla chips

3 tablespoons vegetable oil

Directions

In a large bowl, combine first five ingredients, set aside. In microwave safe bowl, heat chips and oil for two minutes (or until smooth), stirring every 30 seconds or so. Pour over cereal mixture and mix well. Spread onto three wax paper lined baking sheets until cool. Break apart.

Chocolate Blossoms

I know it is not even Thanksgiving yet, but once I saw these Holiday Hershey Kisses were back on the shelves this weekend, I knew I had to make these again. These are my absolute favorite Christmas cookie to make. If I make as many this year as I did last, Hershey and Ghirardelli should not have to worry about their holiday sales numbers! lol

If you haven’t had these specific kisses before, they are candy cane flavored, and pair wonderfully with these chocolate cookies. The recipe comes from America’s Test Kitchen, and is fairly easy to make, even if you are a beginner like me. Two words of wisdom on these if you decide to make them. First, only bake one sheet of cookies at a time, roughly in the middle of your oven. Above that, you need to have an empty baking sheet near the top rack. If not, once the cookies go back in the oven with the candies added, you will turn the tops of the candies brown, taking away from their pure white and red coloring. This will not change the taste, but makes for a poor presentation. Second, do NOT touch the kisses until completely cooled. Chocolate retains its shape when melted (for the most part). They will look hard and in tact, but if you touch one before they are completely cooled, the kiss will cave under the pressure. I cool my cookies on a rack for 30 minutes or so, then place the rack in the freezer for an additional 30 minutes to complete the cool down process. After that, the kisses cookies are fine to be handled and eaten or stored.

Enjoy!

IMG_1654

Just out of the oven to cool. If you touch the kiss at this point, it will cave and fall.

IMG_1656

IMG_1660

IMG_1663

Chocolate Blossoms

Ingredients

1 cup (5 ounces) all-purpose flour

¼ cup (3/4 ounces) Dutch-processed cocoa powder

½ teaspoon baking powder

¼ teaspoon salt

6 tablespoons unsalted butter

2 ounces bittersweet chocolate, chopped

2/3 cup (4 2/3 ounces) sugar

1 large egg plus 1 large egg white

1 teaspoon vanilla extract

24-26 Hershey’s Candy Cane Kisses, unwrapped

Directions

Heat oven to 350 degrees, and line baking sheet with parchment paper.

Whisk flour, cocoa, baking powder, and salt together in a small bowl. Microwave butter and chocolate in bowl at 50 percent power, stirring often until melted. Let cool slightly. Add sugar, egg and egg white, and vanilla and mix until combined. Using rubber spatula, stir in flour mixture until just incorporated. Let dough sit until thickened, about 5 minutes.

Working with 1 tablespoon dough at a time, roll into balls and space them 2 inches apart on prepared sheet. Bake until puffed and just set, 10-12 minutes, rotating sheet halfway through baking. Working quickly, remove sheet from oven and place 1 candy in center of each cookie, pressing down lightly. Return sheet to oven* and bake two minutes longer. Let cookies cool on sheet for 10 minutes, then transfer to wire rack and let cool completely before serving.

*Note: Place an empty baking sheet on the top rack in the oven prior to placing the cookies with candies back into the oven. If you do not, the tops of the kisses will discolor, turning brown from the direct heat. This does not affect taste, but makes for poor presentation. If you need to bake in batches, do it verse placing two sheets with cookies in the oven at the same time.

Come find me on Facebook here.

Pumpkin Crisp with Cream Cheese Frosting

I understand that by now, we all have no shortage of pumpkin recipes to make and to try, not too mention our long standing favorites. But I need to add one more to your list today. The primary reason is, the simplicity and equal deliciousness of this recipe. It is a mix between a cake and a crisp, such as a traditional apple crisp. It is covered by a nice thin cream cheese frosting.

Over the last few years when I have become more serious about cooking, and preparing healthier meals for my family, I have slowly gone away from boxed, prepared foods. Not that I always cook healthy from scratch now, but at least I am aware of what is going into our food verse some of the ingredients on boxes that I couldn’t pronounce if I tried. But this recipe is an exception, as I could not figure out how to easily replace the box cake mix and it still turn out well. So I am cheating on this recipe, but hey, we are all entitled to that once in a while right?!? And honestly, sometimes it is just so darn convenient and necessary to use a box solution!

On the frosting, the below measurements makes a nice thin layer of frosting. I like it like that, as I want more of the cake/crisp flavor in each bite. But my wife is suggesting next time I double the frosting recipe for a thicker layer. Also, please be mindful of the step that says “Sprinkle and PAT nuts into mixture.” If you do not (like me, reference pic below), when you go to frost it, you will get a handful of loose nuts on top that will mix into the frosting. Of course this does nothing to alter the taste, but aesthetically it is not as pleasing.

Enjoy!

This is the first 5 ingredients mixed and added to the bowl.

IMG_1646

With the cake mix and nuts added.

IMG_1648

The cooled butter spooned over the top.

IMG_1649

Out of the oven, going to cool before being frosted.

IMG_1650

Finished product. Notice the nuts mixed into the frosting? And by the way, I also forgot to get a shot of a slices served on a plate. Next time!

IMG_1651

Pumpkin Crisp with a Cream Cheese Frosting

Ingredients

1 can pure pumpkin (15 oz)

1 can evaporated milk (12 oz)

1 cup sugar

½ teaspoon cinnamon

3 eggs

1 box yellow cake mix

1 cup chopped pecans or walnuts

2 sticks butter, melted and cooled

Frosting

8 oz package cream cheese

¾ cup frozen whipped topping, thawed

1 ½ cups powdered sugar

Directions

Preheat oven to 350 degrees F. Coat a 13×9 pan with non-stick cooking spray. Mix the first 5 ingredients together, pour into pan. Sprinkle dry cake mix over mixture. Sprinkle and pat nuts into mixture. Spoon cooled butter over nuts. Bake for 50-55 minutes. Cool thoroughly. Frost when cooled.

Frosting

Combine three ingredients thoroughly with a whisk or hand mixer. Frost and refrigerate until served.

Come find me on Facebook here.

Almond Biscotti

I am now officially ready for the Fall! First, today I found my espresso tower cup set which had been packed up, and second, I learned how to make some wonderfully tasty Almond Biscotti! Again, I leaned on America’s Test Kitchen to teach me how, and they did not disappoint. It was relatively easy to moderate I would say. But if I can do it, anyone can!

One of the best things about biscotti is, it can be kept for about a month, if you keep it in an airtight container. Not that this batch has any hope of making it more than a week or so! But, as holidays get closer and cooking and baking picks up, this is something that can be made a week or so ahead of time, getting one more thing out of the way when time is of an essence.


IMG_1575

Two loaves headed into the oven.

IMG_1581 IMG_1583

Out of the oven, and then once cooled for 30 minutes, sliced and put on a wire rack, which I then put in a rimmed baking sheet.

IMG_1584

IMG_1586

IMG_1588


Almond Biscotti

Ingredients

1 1/4 cups (6 1/4 ounces) whole almonds, lightly toasted

1 3/4 cups (8 3/4 ounces) all-purpose flour

2 teaspoons baking powder

1/4 teaspoon salt

2 large eggs, plus 1 large white beaten with pinch salt

1 cup (7 ounces) sugar

4 tablespoons unsalted butter, melted and cooled

1 1/2 teaspoons almond extract

1/2 teaspoon vanilla extract

Vegetable oil spray

Instructions

Adjust oven rack to middle position and heat oven to 325 degrees. Using ruler and pencil, draw two 8 by 3-inch rectangles, spaced 4 inches apart, on piece of parchment paper. Grease baking sheet and place parchment on it, ink side down.

Pulse 1 cup almonds in food processor until coarsely chopped, 8 to 10 pulses; transfer to bowl and set aside. Process remaining 1/4 cup almonds in food processor until finely ground, about 45 seconds. Add flour, baking powder, and salt; process to combine, about 15 seconds. Transfer flour mixture to second bowl. Process 2 eggs in now empty food processor until lightened in color and almost doubled in volume, about 3 minutes. With processor running, slowly add sugar until thoroughly combined, about 15 seconds. Add melted butter, almond extract, and vanilla and process until combined, about 10 seconds. Transfer egg mixture to medium bowl. Sprinkle half of flour mixture over egg mixture and, using spatula, gently fold until just combined. Add remaining flour mixture and chopped almonds and gently fold until just combined.

Divide batter in half. Using floured hands, form each half into 8 by 3-inch rectangle, using lines on parchment as guide. Spray each loaf lightly with oil spray. Using rubber spatula lightly coated with oil spray, smooth tops and sides of rectangles. Gently brush tops of loaves with egg white wash. Bake until loaves are golden and just beginning to crack on top, 25 to 30 minutes, rotating pan halfway through baking.

Let loaves cool on baking sheet for 30 minutes. Transfer loaves to cutting board. Using serrated knife, slice each loaf on slight bias into 1/2-inch-thick slices. Lay slices, cut side down, about 1/4 inch apart on wire rack set in rimmed baking sheet. Bake until crisp and golden brown on both sides, about 35 minutes, flipping slices halfway through baking. Let cool completely before serving. Biscotti can be stored in airtight container for up to 1 month.

Crunchy Chocolate Chip Cookies

My eldest son (5) is a self-proclaimed cookie monster! Odd in fact, as he doesn’t eat or prefer most sweets. But don’t get in between him and chocolate, or chocolate chip cookies! Over the last number of months, we had experimented with different types of cookies, and neglected the good old basic chocolate chip variety. Until that is, reading Sarah ‘n Spices’ My Good Eats blog about Alton Brown’s three go-to chocolate chip cookie recipes. As we all know, they can come in a variety of forms, and everyone has their own preference. He provides the basics for thin, chewy, and puffy.

As these were for my son, I gave him the choice of which ones he would like to make, trying my best to steer him towards the chewy. To no avail, as he picked the thin, or crunchy. Which was fine as I really like crunchy cookies too. Ingredients in hand, along with his step-stool so he can help me, yesterday we set about to make the best chocolate chip cookies we could. As we were both covered in flour, sugar, and chocolate, it is probably a good thing I was unable to take pictures during the process as he and I are not always the neatest boys around. It looked like a dough machine exploded in our kitchen! But man was it worth it! They turned out excellent! And my son was an awesome helper, especially as a taste tester for the chocolate chips, to make sure they were edible of course (and he made sure he had a good sampling size to boot!) before they went into the batter.

As a side note, the directions imply using a stand mixer (which I imagine most people do when making cookies) for these, but as we don’t have one, we used a hand held mixer and it seemed to work just fine. It just adds some additional standing at the bowl elbow grease instead of having a stand style do it for you.

Enjoy!

IMG_1566

Fresh out of the oven. I probably could have left them in there a couple of more minutes to crisp up just a little more, but these were perfect for us.

IMG_1567

This platter of cookies was about 3/4 of the entire batch, to give you an idea of how many the recipe will make.


Crunchy Chocolate Chip Cookies

Ingredients

2 ¼ cups all-purpose flour
1 teaspoon kosher salt
1 teaspoon baking soda
1 egg
2 ounces milk
1 ½ teaspoon vanilla extract
2 sticks unsalted butter
1 cup sugar
½ cup brown sugar
2 cups semisweet chocolate chips

Directions

Heat oven to 375 degrees F. Sift together the flour, salt, and baking soda in a mixing bowl. Combine the egg, milk, and vanilla and bring to room temperature in another bowl.
 
Cream the butter in the mixer’s work bowl, starting on low speed to soften the butter. Add the sugars. Increase the speed, and cream the mixture until light and fluffy. Reduce the speed and add the egg mixture slowly. Increase the speed and mix until well combined.
 
Slowly add the flour mixture, scraping the sides of the bowl until thoroughly combined. Stir in the chocolate chips. Scoop onto parchment-lined baking sheets, 6 cookies per sheet. Bake for 13-15 minutes, checking the cookies after 5 minutes. Rotate the baking sheets for more even browning.
 
Remove the cookies from the pans immediately. Once cooled, store in an airtight container.
 

Come follow me on Facebook here.

Mom’s Apple Tart

This is in fact my Mom’s Apple Tart recipe, and trust me, you must try it! She is the absolute best baker I know, and best overall cook for that matter too. This was my first attempt at it, and I am very pleased with how it turned out. It is easy enough for a beginner like me, as long as you follow her directions.

The recommendation on types of apples is hers. She lives in New England, and unfortunately down here in TX, I can not find any McIntosh apples right now, so I used Honey Crisp. They work well too.

IMG_1515

Can you imagine how great my house smelled when I pulled this out of the oven!!

FullSizeRender

Cooled off a bit, and outer springform shell removed.

IMG_1522

Yum!!

Mom’s Apple Tart

Ingredients

½ cup butter

¼ cup sugar

1 teaspoon lemon juice

1 cup flour

1 pound cream cheese

½ cup brown sugar

1 large egg

2 large apples (I use McIntosh but Cortland would be good too)

½ cup sugar

1 teaspoon cinnamon

Directions

Cream the butter, ¼ cup sugar and lemon juice together in a large bowl. Stir in the flour until well blended. Press the dough onto the bottom and about 1 and ½ inches up sides of a 9” springform pan. Refrigerate.

Preheat oven to 425 degrees.

Place the cream cheese and brown sugar in a bowl and beat until fluffy. Add egg, and beat until smooth.

Peel, core, and slice apples into ¼ inch pieces. In a large bowl, combine remaining ½ cup sugar and cinnamon, add the apple slices and toss until coated.

Pour the cream cheese filling into prepared crust and cover with the sugared apple slices. Bake for 15 minutes at 425 degrees, reduce the heat to 350 degrees and continue baking for 40-45 minutes.

Remove from oven and cool on a wire rack. Use a knife to loosen the cake before releasing the spring and lifting the sides from the bottom of the pan.

Enjoy!!

Skillet Apple Pie with Cinnamon Infused Whipped Cream

Ok, so truth in lending here. I am not a dessert kind of person. Give me a salty snack over a sweet snack any day of the week. That being said, the Skillet Apple Pie is incredible! And to be honest, you need no other reason to make this other than the cinnamon infused whipped cream. Chances are, you will be making this whipped cream and putting it on everything you can think of! My wife, Mrs. Sweet Tooth thought this was incredible, and when I dared to ask if we should give some of the extra’s to a neighbor I about got my head bit off, it was that good. And as always, don’t mind the pictures as that is not why I do this. I’d rather eat food than photograph it. Hence why there are no photos of the finished product before half of it was gone! Enjoy!

photo 1

The butter and brown sugar cooking together to start.

photo 2

Throw in one pie crust and the apples.

photo 3

Top with the second crust, and make slits in to it. Please do a better job than me! (FYI, this is the first pie I have ever made, so I plead for beginners forgiveness on the looks of it!)

photo 4

The final product, again already half eaten because it just smelled that good that I forgot to take a picture before we dived in. Spoon the whipped cream over the individual servings when you plate / bowl them.

Ingredients 

½ cup (1 stick) unsalted butter

1 cup light brown sugar

2 refrigerated rolled pie crusts, such as Pillsbury

One 21-ounce can apple pie filling

2 tablespoons cinnamon sugar*

Directions
Preheat the oven to 400 degrees F.

For the skillet apple pie: Melt the butter in a 9-inch cast-iron skillet; set aside 1 tablespoon of the melted butter for the top crust. To the melted butter, add the brown sugar and melt them together on medium heat, about 2 minutes. Remove from the heat and line the skillet with one of the pie crusts. Pour the apple pie filling over the crust and sprinkle with 1 tablespoon of the cinnamon sugar. Use the second pie crust to cover the filling. Brush the top with the reserved melted butter, then evenly sprinkle the remaining 1 tablespoon cinnamon sugar on top. Cut vents in the middle of the pie. Bake for 30 minutes. Serve hot, topped with a generous dollop of cinnamon whipped cream.

For the cinnamon whipped cream: Chill a large metal mixing bowl and a wire beater attachment in the freezer for about 20 minutes. Pour the cream, cinnamon and sugar into the cold mixing bowl and beat until soft peaks form, 2 to 3 minutes; the mixture should hold its shape when dropped from a spoon. Don’t overbeat or you’ll have sweetened butter!

*I will normally have a cinnamon sugar mixture already mixed up for random uses. The ratio I have found works best is ¼ cup sugar with 1 tablespoon cinnamon.

Recipe from Trisha’s Southern Cooking

Chocolate-Mint Cookies

It is amazing how time flies. My eldest son started Kindergarten today, and it seems like he was just born yesterday. To celebrate his first day, I made his favorite cookies. Chocolate cookies topped with an Andes mint. Oh so delicious. And honestly, I never really need a reason to make these; I LOVE them as does my wife.

One of the great things about these cookies as well is they freeze really well. I will keep a quarter of them out when I make them, and freeze the rest in quarter batches, and pull them out when needed.

Can you get more handsome than this??

Can you get more handsome than this??

Just out of the oven

Just out of the oven

With Andes mint added

With Andes mint added

photo 1 (2)

Finished product

Finished product

Finished product

Chocolate-Mint Cookies

Ingredients

12 tablespoons unsalted butter, softened

1 ½ cups packed (10 ½ ounces) brown sugar

2 tablespoons water

2 cups (12 ounces) semisweet chocolate chips

1 ½ cups (12 ½ ounces) all-purpose flour

1 ¼ teaspoons baking soda

½ teaspoon salt

2 large eggs

45 Crème de Menthe Andes Mints

Directions

Combine butter, sugar, and water in medium saucepan and cook over low heat, stirring occasionally, until butter is melted, about 3 minutes. Add chocolate chips and stir constantly until chips are melted. Transfer mixture to bowl of stand mixer fitted with paddle and let cool for 10 minutes.

Whisk flour, baking soda, and salt together in separate bowl. Add eggs to bowl with chocolate mixture and beat on medium-high speed until smooth, about 2 minutes. Reduce speed to low, add flour mixture in 3 additions, and mix until just combined. Refrigerate dough for 1 hour.

Adjust oven racks to upper-middle and lower-middle positions and heat oven to 350 degrees. Line 2 baking sheets with parchment paper. Working with 1 heaping tablespoon dough at a time, roll into balls and space them 2 inches apart on prepared sheets. Bake until just set, 7 to 9 minutes, switching and rotating sheets halfway through baking. Immediately place 1 mint in center of each cookie. Let stand until mint is softened, about 5 minutes, and then spread melted min over tops of cookies. Transfer cookies to wire rack. Repeat with remaining dough and mints. Let cookies cool completely before serving.

Recipe from Americas Test Kitchen Best Cookies Ever magazine.