Roasted Corn Salsa

Here is an easy and quick summertime recipe for you, roasted corn salsa. This salsa can go with a variety of meals, especially anything cook-out related. If you go the fresh corn route, recommended, you might have to stop at the store. If you go the canned corn route, you probably already have everything you need in your pantry and refrigerator.

When I did this the first time (pictured), I did not roast the corn long enough, but it still turned out wonderful. Since then, I get a little more browning on the corn, but always forget to take a picture. Can’t win them all, right!

IMG_2397

Roasted Corn Salsa (This can easily be doubled or more)

Ingredients:

8 ounces roasted corn (fresh shucked is best, but not a must)

1/2 tomato, diced

1/4 cup red onion, diced

Dash of cayenne

1 tbsp jalapeno, diced (more to taste)

1/4 cup cilantro, diced

1/2 tbsp lime juice

salt to taste

Directions:

If using a cast iron skillet, set skillet over medium heat. Once hot, add the corn and roast for 4-6 minutes. Don’t move the corn for 1-2 minutes, allowing it to start to brown. If using non-stick, add just a little bit of EVOO to the pan when turning it on.

Once the corn is browned to your liking, remove from the heat, and add to a bowl with the remainder of the ingredients. Stir well to incorporate. Chill, then serve.

Come find me on Facebook here.

Jalapeno and Cheddar Corn Bread Muffins

Living in the South, it is pretty much mandatory to have a go-to corn bread recipe. Nothing against Jiffy Corn Muffin Mix, as I made that for a long time, and it really turns out just fine. But for barely any more work, you can try this one which is absolutely delicious, and has that made from scratch, pure goodness to it.

IMG_2050

I started with a recipe from The Comfort of Cooking. Really, the only change I made was instead of using regular jalapeno’s, minced, I started with jarred sliced jalapeno’s and minced them. As a personal preference, I did not want the chance of having crunchy jalapeno pieces in the muffins, and I wasn’t sure if the bake time would be enough to soften them. I trust the muffins are great either way. I doubled the below recipe to make 24 muffins, as I was making them for a crowd. It doubled perfectly, and were great served slightly warm. You could also use this recipe for a corn bread made in a 8×8 baking dish.

Enjoy!

IMG_2049

Jalapeno and Cheddar Corn Bread Muffins

Ingredients

1/2 cup unsalted butter, melted
2/3 cup granulated sugar
1 1/2 tablespoons honey
2 large eggs
1 cup buttermilk
1 cup yellow cornmeal
1 cup flour
1/2 teaspoon salt
1/2 teaspoon baking soda
2 tablespoons jarred jalapeno slices, minced (more to taste)
1/2 cup shredded cheddar cheese

Directions

Preheat your oven to 350 degrees F.

In a medium bowl, stir butter, sugar and honey together. Whisk in eggs and buttermilk. Add cornmeal, flour, salt and baking soda. Do not over-mix. Fold in jalapeno and cheese.

Divide batter equally between the cups of a greased muffin tin. Bake for 20 minutes. Test the center of one muffin with a toothpick and make sure it comes out clean. If not clean, bake for about 5 more minutes.

Come find me on Facebook here.

Baked Beans, Southern Style

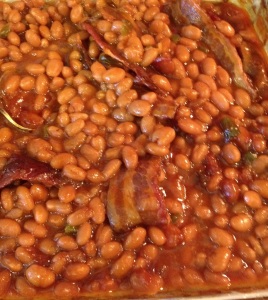
Truth be told, baked beans out of a can, such as Bush’s Baked Beans are really quite good. One of my favorite meals is a couple of hot dogs, cut up and heated in a skillet, and then a can of Bush’s baked beans thrown on top and mixed together. Comfort food at it’s finest.

But of course, there is always the element of personal satisfaction of making something from scratch, that rivals or beats your perceived gold standard. These beans are one of those dishes. Incredibly easy to make, and pretty much fool-proof. It takes some time, but after the initial couple of stages, all the time is the beans sitting, simmering in the oven. If you are on a gluten free diet, these beans are perfect for you.

This recipe is from Ree Drummond, aka The Pioneer Woman. As with most of her recipes, it feeds a small circus troupe. If I am making this for just my family, I half the recipe and make it in a 8×8″ glass dish. If having company over, I leave it as is and use a 9×13″. Give it a try, you will not be disappointed!

IMG_2032

Southern Style Baked Beans

Serves up to 18

8 slices bacon, halved

1 medium onion, cut into small dice

1/2 medium green pepper, cut into small dice

3 large cans (28 ounces each) pork and beans

3/4 cup barbecue sauce

1/2 cup brown sugar

1/4 cup distilled or cider vinegar

2 teaspoons dry mustard or 2 tablespoons Dijon

Adjust oven rack to lower-middle position and heat oven to 325 degrees. Fry bacon in large, deep sauté pan skillet until bacon has partially cooked and released about 1/4 cup drippings. Remove bacon from pan and drain on paper towels. Add onions and peppers to drippings in pan and sauté until tender, about 5 minutes.

Add beans and remaining ingredients bring to a simmer. (If skillet is not large enough, add beans and heat to a simmer then transfer to a large bowl and stir in remaining ingredients). Pour flavored beans into a greased 13-by 9-inch (or similar size) ovenproof pan. Top with bacon, then bake until beans are bubbly and sauce is the consistency of pancake syrup, about 2 hours. Let stand to thicken slightly and serve.

Come find me on Facebook here.

Jalapeno and Green Apple Fried Rice

Have you ever been stuck in a rut when it comes to cooking, seldom branching out from what you know and like best? A few weeks before Easter I started planning our Easter dinner, and couldn’t get the old staples out of my head. Those staples are great for a number of reasons, but I wanted at least one new dish to be new.

Along comes a friend who recommends Jalapeno and Green Apple Fried Rice. First, I did a double take sure that I heard wrong. But lo and behold, I had not. Not having the confidence of a seasoned cook yet, there was no way I was serving that for Easter without trying it first. With two weeks to spare, I had plenty of time. Halfway there, I convinced my wife we needed to try it, no matter how out in left field it sounded. We did, and I baked a couple of simple chicken breasts to go along with it. For me, I turned it into a sort of rice bowl with the chicken cut-up on top, see below.

FullSizeRender

It was REALLY, REALLY good. And as odd as the combination sounded, it really came together so nicely, balancing itself out perfectly. So, it was made again for Easter and all our guests really enjoyed it, albeit everyone had to ask what it was when they peered into the bowl. Ha! Give it a try, you won’t be disappointed. One of our eaters is on a gluten free diet, which this dish is perfect for.

This is the Easter version. I was running around like a madman trying to bring everything together, that I am surprised I even got a picture of it at all. Sorry it’s not pretty!

IMG_2031

Jalapeno and Green Apple Fried Rice

1 Granny Smith Apple, cored and thinly sliced

1 ½ – 2 Jalapeno pepper, veins and seeds removed, and diced

½ small red onion, diced

3/4 teaspoon fennel or anise

2 TBSP EVOO

1 glove, garlic

1 cup Jasmine Rice

2 cups hot water (more if needed)

Salt and Pepper

Directions:

Core granny smith apple, leaving skin on, and slice them;  Saute apples, pepper, onion all in evoo and add anise or fennel seed. Add jasmine rice and continue to saute on med low heat till rice is lightly toasted. Add hot water, bring to a boil for 10 minutes, reduce heat to low, tightly cover with seran wrap and lid and continue to cook on low for another 30-45 minutes. You may to add some water over rice at the end, depending on how tender and sticky you want the rice.  Salt and pepper to taste.

Zucchini Pizza Bites

A quick little healthy meal or snack for you when you are craving pizza. My wife requested these a couple of weeks ago, and she was very happy with how they turned out. Full disclosure on my part, yup, I will take regular pizza over these any day. But if you are looking for that healthier and or gluten free alternative, give these a shot.

The best thing about these is you really don’t even need a recipe. After you crisp them up a little, top with whatever floats your boat that day. We had mozzarella cheese, pepperoni, and jarred pizza sauce on hand, so that is what I used. I used one zucchini on this batch as it was only my wife eating them that night. This picture was half of what it made.

IMG_1881 (2)

Ingredients:

1-2 zucchini, sliced in 1/4 to 1/2 inch slices

Salt and pepper

pizza sauce

mozzarella cheese, shredded

pepperoni, diced

Directions:

Preheat your oven on the broiler setting. Sprinkle both sides of the zucchini slices lightly with salt and pepper. Place in a single layer on a baking sheet. Broil for 2-3 minutes, flip, and repeat on the underside. Remove from the over, and layer, sauce, cheese, and pepperoni pieces on each slice of zucchini. Place back under the broiler for 1-2 minutes, or until cheese is starting to melt.

Adapted from DamnDelicious

Gouda Cheddar Tater Tots

This is one of the more exciting (to me) posts I have done on antics in cooking to date, so I hope you all enjoy. If you have followed me for a little while, you will have noticed I use many tried and true recipes from established chefs, and very rarely create something myself. For the past three weeks I have been honing this one down, and believe I have finally hit a home run.

Truth be told however, the idea did come from a restaurant I frequent. My business travels take me to Washington D.C. often, and when I go I usually stay in Old Town Alexandria, VA. I came by a restaurant in Old Town named T.J. Stones a couple of years ago, and make it a point to stop there whenever I am in town. They have the best ever Gouda Tater Tots on the menu. I have tried and tried to coax the Executive Chef to sneak me the recipe, which not to my surprise, he was never willing to do. I settled for just looking forward to them during my trips.

Roughly 3 weeks ago I started planning my Super Bowl spread, and these tots came to my mind first. I set out on a mission to recreate them. I have made approximately 5 batches since, adding and deleting ingredients each time, with the last being on Sunday (thankfully) with what I believe were the perfect, yet still easy to make rendition. Enjoy!

(Note: The restaurant mentioned serves their tots with a horseradish buttermilk dipping sauce, which is also excellent. Since I wouldn’t even know where to start on that, I just serve mine with ranch. Works out pretty well.)

IMG_1871

Gouda Cheddar Tater Tots

Ingredients

3 Russet potatoes

1 cup finely shredded Gouda cheese (regular or smoked)

1 cup finely shredded cheddar cheese

1 teaspoon salt

1/2 teaspoon pepper

1/8 cup sour cream

1 tablespoon minced jalapeno (optional)

Vegetable oil

Corn starch (for dredging)

Directions

Preheat oven to 350 degrees. Wrap potatoes in foil and bake for 30-40 minutes or until the outsides begin to soften, while not cooking all the way through. Remove from oven. Once cooled enough to handle, peel potatoes and shred in a bowl using the smallest holes on a box shredder. Using paper towels, slightly pat down on the shredded potatoes to remove some of the released moisture, but not all. To the potatoes, add the cheeses, salt and pepper, sour cream, and jalapenos (if using) and mix thoroughly.

Heat oil in a large pot to 350 degrees. Form potato mixture into 2 inch balls. If you are making ahead, you can refrigerate them at this time. If not, once the balls are formed, roll them in cornstarch to a get a thin even coating. Fry the tots in small batches of 8-10 until golden brown, being careful not to overcrowd your oil. Remove from oil and place on a paper towel lined plate. Serve warm.

Best Drop Biscuits

First I want to say, please pardon my absence over the last couple of months in the blogging world. It was a rough holiday season in many ways, but also a kind one in other ways. I do not plan on drowning you with the details, but wanted to say I am back and will be adding new recipes starting with these awesome Best Drop Biscuits.

In early December, I had to make an unexpected trip to New England and was staying with one of my sisters for a few days. Her and I always discuss food, as I am usually trying to pry her and her husbands great recipes out of them. But one night I was sitting in her living room flipping through her new cookbook, “The Complete Cook’s Country TV Show Cookbook). As it looks more like an encyclopedia than a cookbook, I was using her book marked pages to see which recipes caught her eye, as I would have needed a week to go page by page. I came across Best Drop Biscuits, and I am telling you since, I could not be much happier! I have tried in the past different biscuit recipes and either I fail, or they are too cumbersome to make. These on the other hand, are the most delicious ones I have had, and are tremendously easy to make. I typically have all the ingredients on hand anyways, so I can make them on a whim at almost anytime, which I have quite a few times now.

Enjoy!

IMG_1784

Out, cooled off for a couple of minutes.

Best Drop Biscuits

Ingredients

2 cups unbleached all-purpose flour

2 teaspoons baking powder

1 teaspoon sugar

¾ teaspoon table salt

½ teaspoon baking soda

1 cup buttermilk, chilled

8 tablespoons unsalted butter, melted and cooled slightly, plus 2 tablespoons melted butter for brushing the biscuits

Directions

Adjust an oven rack to the middle position and heat the oven to 475 degrees. Line a large rimmed baking sheet with parchment paper. Whisk the flour, baking powder, sugar, salt, and baking soda together in a large bowl. Combine the buttermilk and 8 tablespoons of the melted butter in a medium bowl, stirring until the butter forms small clumps.

Add the buttermilk mixture to the dry ingredients and stir with a rubber spatula until just incorporated and the batter pulls away from the sides of the bowl. Using a greased 1/4‑cup measuring cup, scoop a level amount of batter and drop onto the prepared baking sheet. Repeat with the remaining batter, spacing the biscuits about 1 1/2 inches apart. Bake until the tops are golden brown and crisp, 12 to 14 minutes.

Come find me on Facebook at Antics in Cooking.

Creamy Corn Dip

If your Fall season is anything like mine, you are fixing to start attending a host of different pot-luck types of meals. Whether family gatherings or luncheons at work, the Fall tends to lend itself to many large gatherings mcentered around food. This creamy corn dip is delicious, incredibly easy to make, makes a great appetizer, and produces a large helping suitable for large groups. This is one of my wife’s recipes. She just made this for a school luncheon, and least to say, it looked like someone licked the bowl clean when my wife brought the bowl home. Apparently it was a hit!

You can easily half the below recipe for a family size portion.

Enjoy!

IMG_1591

IMG_1592

Corn Dip

Ingredients

2 cans MexiCorn, drained
2 cups shredded cheddar cheese
1 cup mayonnaise
1 cup sour cream
1 can (4.5 oz) green chilis
1 jalapeno, chopped and seeded (keep seeds if you prefer it spicy)
Directions
Mix all the ingredients until incorporated in a large serving bowl. Refrigerate until served. Serve with Fritos, or favorite dip chip.

Come find me on Facebook here.

Crunchy Bread and Butter Pickles

I feel like I conquered another challenge this week, to go along with my pulled pork success. Good thing it is the end of the week, or I wouldn’t know what to do with myself now! Ha!

My wife Loves pickles, and can eat them with a variety of dishes. Even though I REALLY do not like pickles, I wanted to make them for her. So about a month ago, I made my first attempt at homemade pickles. The actual pickle making process is easy and straightforward. The waiting time until you can eat them is what stinks. On the first batch, I was so excited for her to try them, the week long waiting period seemed to take forever. Finally that day came, and I basically forced them on her. I think it might have even been before breakfast, but I didn’t want to wait any longer. As soon as she bit in to the first one, my hopes of them being perfect were dashed. I could just tell before she ever said anything they stunk. I was down, but not out!

So, I scour and search the internet looking for the answer. Once I have my mind set on something, there is not much that can change it. I was determined to make a damn good pickle, no matter how long it too. Finally, I stumbled back to a blog I check out every once in a while, White on Rice Couple. They always have pretty interesting recipes, and I noticed they had a bread and butter pickle recipe, utilizing old family pickling techniques. I was intrigued, and this week decided to give it a shot.

I made them on Monday, and decided I couldn’t wait a full 7 days to find out if I had a hit or miss. Friday night we were eating pulled pork sandwiches, and I figured pickles would be a great compliment to the sandwich. So my wife tried them, and Loved them! She kept going back to the jar for more. The ultimate test was, when I asked her if they sold them in the store, would she buy them over her normal favorite pickle brand. She said yes! And trust me, this gal does not pull any punches with my cooking. She is not slow to tell me something stinks when it does, so I trust her honesty in this. You should to!

So, if you like B&B pickles, these are a must try! I cannot confirm that this recipe is for true canning, which in my mind means processing the cans until sealed, and let them sit in your pantry for a year. I know nothing about canning, other than certain recipes are good for that, and others are not. I will keep these cold in the fridge, for up to a couple of months or so, but I know they wont make it that long anyway!

The next time I make these, I will take more pictures of the process.

IMG_1504

Bread and Butter Pickles

Ingredients

3 pounds crisp cucumbers, slices ¼ inch thick
½ onion, sliced thinly
¼ cup kosher or sea salt
2 cups white vinegar
½ cup water
1 ½ cups sugar
2 tablespoons mustard seeds
1 teaspoon celery seeds
1 teaspoon turmeric

Directions

Toss the cucumbers and onions with the salt in a large bowl. Transfer to a strainer sitting over the sink. Let rest for 1-2 hours. The cucumbers will release a lot of water during this, which is a good thing!
 
Rinse the cucumbers and onions well, and place on a couple of sheet pans lines with paper towels. Add a sheet of paper towels on top as well. Let them dry for 8-10 hours, or even overnight.
 
After the drying period, combine the vinegar, water, sugar, mustard seeds, celery seeds, and turmeric in a large saucepan. Heat to boil. Add in the cucumbers and onions, and continue to heat until it reaches a boil again.
 
Remove from the heat, and place the cucumbers and onions in canning jars, topping each jar with the vinegar mixture, and close with the lids.
 
Let cool for a few minutes, and then place jars in the refrigerator. Allow at least 4-5 days for the pickles to marinate before eating, to allow all the flavors to blend.
 

Recipe from White on Rice Couple

Green Bean Bundles

The trend lately in cooking is to take a not-so-healthy dish and try to lighten it up, while preserving the great taste. I am doing my best today to turn that upside down! I believe this recipe manages to take a very healthy food, green beans, and make them as bad for you as possible! But I guarantee at the same time, you have never tasted green beans as good as these. So go ahead and splurge once in a while. Always makes for a delicious side dish at Thanksgiving, or any other day of the year for that matter!

 IMG_1500

And as these pretty much taste like candy, it is also a very kid friendly dish and will get your kids to eat their vegetables, albeit ones coated in sugar, bacon, and butter! lol

And a note on the portion. The below measurements are perfect for a family of 4. If you are feeding more than two adults, or plenty of kids, simply double the ingredients and place in a 9×13 pan. You can also assemble the entire dish ahead of time, refrigerate, then stick in the oven when you are ready to cook.

FullSizeRender

Beans wrapped, and secured with a toothpick.

IMG_1494

Out of the oven.

IMG_1502

Umm…..yeah, no matter what is surrounding it, you can still say you are eating a serving of vegetables! 🙂

Green Bean Bundles

Ingredients

1 can of whole green beans, drained

6 slices of bacon, cut in half

½ cup brown sugar

½ cup butter, melted

¼ – ½ teaspoon garlic salt

½ teaspoon low sodium soy sauce

Directions

Preheat oven to 350 degrees.

Arrange approximately 10 beans together, wrap with ½ slice of bacon, and secure with a toothpick. Arrange bundles in a 8×8 pan.

Add last four ingredients to a medium bowl, mix thoroughly. Pour marinade over the bundles. Bake for 30 minutes, uncovered.